Author: Mika Laihanen

Note to self: Passing parameter values to XSLT stylesheets with Saxon and .Net

I recently worked on a little .Net project that involved running some XSLT transformations with the help of Saxon API for .Net. At one point, I needed to pass a parameter value – a target path – from C# onto an XSLT stylesheet.

After a bit of digging, I found out that you can use the XdmAtomicValue class to pass a value to a stylesheet.

First, pick up Saxon-HE through NuGet, and add a reference to it:

using Saxon.Api;

Next, setup the files you want to use:

var stylesheet = new FileInfo(@"C:\your\file\stylesheet.xsl");
var inputFile = new FileInfo(@"C:\your\file\input.xml");
var outputFile = new FileInfo(@"C:\your\file\output.xml");

Then, compile your stylesheet:

var processor = new Processor();
var compiler = processor.NewXsltCompiler();
var executable = compiler.Compile(new Uri(stylesheet.FullName));

After that, setup the transformer and transform the input document to a set destination:

var destination = new DomDestination();
using (var inputStream = inputFile.OpenRead())
{
    var transformer = executable.Load();
    transformer.SetInputStream(inputStream, new Uri(inputFile.DirectoryName));

    // Create and set the parameter
    XdmAtomicValue parameter = new XdmAtomicValue("Parameter String");
    transformer.SetParameter(new QName("parameterNameInXSLT"), parameter);
    transformer.Run(destination);
}

Finally, save the resulting to your destination of choice:

destination.XmlDocument.Save(outputFile.FullName);

Note that the parameter name you use in transformer.SetParameter() must match the parameter name in your XSTL stylesheet. In this case, you should have the following line in your XSLT stylesheet:

<xsl:param name="parameterNameInXSLT"/>

Dealing with HTML tags and inline items in Passolo

I’ve been using Passolo to deal with UI strings for nearly four years now. Our relationship hasn’t always been the happiest one, but so far, Passolo has been a good enough tool to deal with the .properties style UI strings that I work with:

service.common.username=Username
service.common.phone=Phone number

All it takes to get underway in Passolo is a simple parser that recognizes the part before the = sign as the ID and the part after it as the string. Easy peasy.

Dealing with parameters

Sometimes, we need to present dynamic content like dates, usernames and document IDs on our UI. In these cases, our developers drop in the necessary values as parameters using curly brackets:

service.common.loggedInAs=You're logged in as {0}
service.common.viewingDocument=Viewing document {0} from {1}

Each parameter takes up just three characters, so you’d think there’s no need to have any special treatment for these, right? I have noticed that sometimes – not very often, though – some of our translators have accidentally deleted either the opening or the closing bracket. When we bake strings like those into the software, stuff tends to break and cause me grey hair. And that’s not nice.

The Inline Patterns tool

To combat broken parameters and grey hair, SDL has added a tool to Passolo that lets you define inline patterns that may appear in your UI strings. You can find it under the Project tab:

passolo-inline-patterns-menuitem

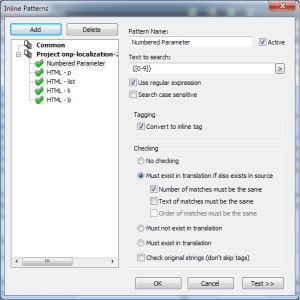
When you click Inline Patterns, Passolo pops up the Inline Patterns window. This is where all the magic happens.

passolo-inline-patterns-window

(more…)

Lecture 7: Working with functions and watching out for errors

During the final lecture, we’ll continue looking at functions. We’ll find out how we can return values from our own functions and look at cases where return values come in handy. If time permits, we’ll have a quick look at how Python lets us anticipate errors and deal with them in ways that won’t break our programs.

Lecture 3: Sequences, Lists and Loops

The third lecture starts off with a look at sequences. We’ll find out what sequences are, how you can access elements in a sto, and how you can create sequences of your own. Next, we’ll take a look at the for loop and examine how you can harness its powers to repeat simple – and complex – tasks with ease. We’ll learn about lists, too, and see how they can be used to store information so that it is easily accessible and modifiable. If we have time, we’ll also take a look at how you can add more functionality into your programs easily with Python Modules.

Lecture 2: User input, conditional statements and loops

The second lecture starts with a quick recap of what we learned last week. After that, we’ll start looking at how to get input from the users into your program, and what to do with that input. After that we’ll move on to conditional statements and learn how we can direct our programs based on, for example, different input that we’ve received from the users. We’ll learn how we can combine different sets of conditions to fine-tune the program flow, and learn to hate missing colons and broken indentation while we do so. After conditional statements, we’ll move on to loop structures, starting with the while loop. While looking a loops, we’ll also have a quick look at what Python modules are and what we can do with them. Once we know everything there is to know about while loops, we’ll learn the horrible truth about strings (they’re actually sequences!). If there’s time, we’ll start working with the for loop, the most magical of all the loops in the world.

Surviving DOS

Here’s the basic set of commands you’ll need to survive the Windows Command Prompt.

Moving between directories

The cd (change directory) command is used to move from one directory to another:

cd <Target directory>

Move to a directory called Python34:

cd Python34

Move to the root directory of the current drive (Win):

cd \

Move to the root directory of this drive (Linux/OSX):

cd / Move up one directory.

For example, from c:\users\mika to c:\users:

cd ..

Move from the current directory – for example c:\Python34 – to the directory c:\users\mika:

cd \users\mika

To move from one drive to another, simply type the drive letter followed by a colon:

x:

(more…)

Lecture 1: Getting Started

Lecture one starts from the very basics. First, we’ll take a look at why this course is on the curriculum (there’s a solid reason!) and have a brief look at what you’ll learn – and what you probably won’t learn – during the course. We’ll also explore what you can expect from the course, if you already have some programming experience. (more…)